10 Tips to Book 2-5 Meetings in a Day [with this Cold Email Checklist].

After sending over 10,000 emails with encouraging results, we have come up with a cold email checklist to help you book 2-5 meetings in a day.
This checklist pairs with our pillar guide: why cold emails get ignored, the 5-layer diagnosis.
If you start your cold emailing journey without understanding the basics, you sure can bid goodbye to
Why is a cold email checklist important?
Now, understandably, there could be a lot of anxiety on your mind every time you send a cold email:
-Will the email reach the contact’s inbox?
-Will it end up in the spam folder?
-If it lands in the inbox, will it be opened?
Even after these many doubts and questions, we still depend on outbound cold emails to generate qualified leads. But are we optimizing them to get the desired results?
Yes and no. In the name of optimization, we concentrate on aspects related to the subject lines, and the email copy, and we stop at that. But the reality is that there are many other factors affecting our cold emails. This cold email checklist will shed some light on the importance of these “many other factors”.
While this is not rocket science, it will save you some time & effort and eliminate a few errors you might be making. Let’s get started.
Cold Email Checklist- Technical Setup
Setting expectations from the strategy
We implemented this strategy with 5 inboxes → emails were sent from 5 different email addresses with the domain salesgear.org.
Through these 5 inboxes, we were able to send 10,000 emails to contacts located in the US/Pacific timezone. These are the results we got –
| Total number of emails sent | 10k over 3 months |
| Open rate | 50% (5k opens) |
| Reply rate | 2.5% (125 replies) |
| Meetings booked | 2-5 per day |
| Deals closed | For every 40 meetings booked, we qualified 25 of them. Out of the 25 qualified meetings, we closed 5 deals |
| Monthly Recurring Revenue | Around $3,000 |
Tools & total investment
Of course, there’s some amount you need to invest in good tools to get the above results. Here are the requirements & recommendations –
- Buy domain specifically for Outbound ($6)
- Godaddy
- Create a few email accounts ($30)
- Create 5 GSuite email accounts for the above-purchased domain
- Build your target data ($99 to $100k)
- Find from data sources like Salesgear, Adapt, Zoominfo, Leadiq
- Clean data: Zero bounce
- Setup your Sequencer ($69 to $200)
- Salesgear, Outreach, Salesloft
Buy your outbound domain
It’s a wise idea to get a dedicated domain for your outbound efforts, especially if your target audience is medium-large. Buy a domain that’s similar to your business name and choose a different & well-reputed top-level domain such as .com, .io, .tech, .us, etc.
At Salesgear, if the target audience is small-medium, we send emails using salesgear.io. If the target audience is large, we use a different domain – salesgear.org.
Please do not buy any of the domains in this list. These have the poorest reputations.
Create new email accounts
Google workspace
If you are using Google Workspace for creating email accounts – navigate to https://workspace.google.com/ and click on ‘Start free trial’. Follow the instructions to set up your Google Workspace account. You can create up to 3 email accounts with your outbound domain.
Pricing:
| Plan | Cost |
| Starter | $6/user/month |
| Standard | $12/user/month |
| Plus | $18/user/month |
| Enterprise | Custom |
Outlook
If you are an Outlook user or prefer to use Outlook – navigate to this page and create an account. You can create up to 3 email accounts here as well.
Pricing:
| Plan | Cost |
| Basic | $6/user/month |
| Business | $8.25/user/month |
| Business Standard | $12.50/user/month |
| Premium | $22.00 per user per month |
Check out this article for a detailed comparison and choose the one that suits your needs.
Set up SPF, DKIM, DMARC
This is one of the main points of an email checklist. SPF, DKIM, and DMARC are a set of email authentication methods to ensure ISPs and mail services that senders are truly authorized to send emails from a particular domain.
Therefore, once you purchase your domain & email addresses, you should set up these parameters for each domain to avoid spam filters and improve email deliverability.
Here are Google/Outlook’s support guides that you can follow to set up these parameters:
| Authentication Method | Google support links | Outlook support links | Tools that we used to check if the setup is working |
| SPF (Sender Policy Framework) | https://support.google.com/a/answer/10684623 | https://docs.microsoft.com/en-us/microsoft-365/security/office-365-security/set-up-spf-in-office-365-to-help-prevent-spoofing | https://mxtoolbox.com/spf.aspx |
| DKIM (DomainKeys Identified Mail) | https://support.google.com/a/answer/174126?hl=en | https://docs.microsoft.com/en-us/microsoft-365/security/office-365-security/use-dkim-to-validate-outbound-email?view=o365-worldwide | https://mxtoolbox.com/dkim.aspx |
| DMARC (Domain-based Message Authentication, Reporting and Conformance) | https://support.google.com/a/answer/2466563?hl=en | https://docs.microsoft.com/en-us/microsoft-365/security/office-365-security/use-dmarc-to-validate-email | https://mxtoolbox.com/dmarc.aspx |
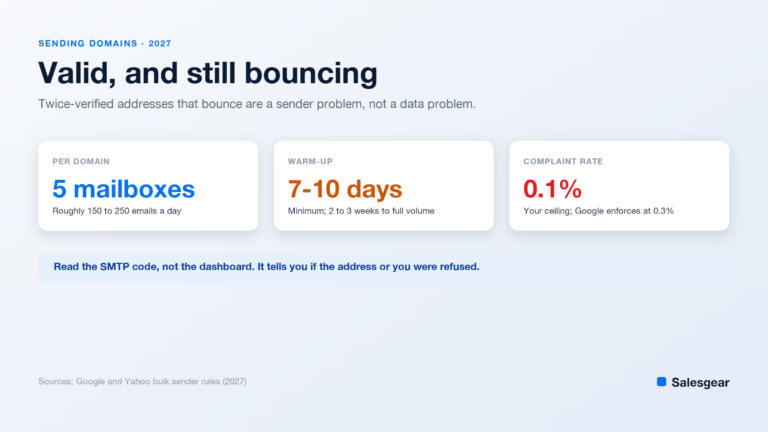
Warm your domain
One of the important things you need to do before proceeding with your email outreach campaigns is to warm up your email address. This develops your domain’s identity and credibility as a sender, which helps gain the mailbox providers’ trust.
If you are sending hyper-personalized emails, keep your emails/day to 5-10 in the first week. Moving on, you can gradually increase the number of emails you send, such as –
- 1st Week: 5 to 10 emails per day
- 2nd Week: 20 to 30 emails per day
- 3rd Week: 30 to 50 emails per day
- 4th Week: 50 to 80 emails per day
Alternatively, you can use email warming tools too.
Free tools that help with email warming –
- GMass – Free and mainly integrates with Gmail.
- Quickmail’s Auto Warmer – Free and integrates with both Gmail & Outlook.
Paid email warming tools –
- Warmupinbox – starts from $9/month and integrates with Gmail & Outlook.
- Lemwarm – starts from $25/month and integrates with Gmail & Outlook.
- Mailwarm – starts from $79 and works with Google SMTP.
It’s up to you to choose manual or automatic but never skip this step. This is an essential part of building a strong email address that’s ready for cold email campaigns.
Build a targeted prospect list
Identify potential target accounts for your solution.
Once you have a list of accounts, you can find the key decision-makers in these accounts.
Get 3 to 5 email addresses from each account. You can find them on any of the leading data providers like Adapt, LeadIq, Salesgear, Zoominfo, etc.
Alternatively, you can access this information directly through LinkedIn with the help of a LinkedIn email finder. Here are a few free ones that you can use-
- Adapt.io
- Hunter.io
- Skrapp.io
- SalesQL.com
Set up your sequencer
The next pointer in the email checklist is the Sequencer. After having the prospect list ready, you can start setting up your sequence.
A sequencer is a tool with a series of automated touchpoints that you will execute over some time to get in touch with your prospects.
- Recommended number of steps in a sequence – 12-14 over 45 days → when you are selling to Mid-market US and 10 steps if you are targeting SMBs.
- The interval between emails – allowing a gap of 2-4 days between each email will be sufficient for the prospect to
- Skip weekends – Tuesdays & Thursdays are the best days to get the highest open rate.
- The best times to send emails – 9-11 am & 1-2 pm are great if your target audiences are located in the US Pacific timezone.
- Write purposeful emails – Give that custom touch by personalizing your emails. And every email should have one purpose/goal only. If your word count exceeds 125, you can always create separate emails.
- A/B testing is a great way to find patterns in your target audience over a period of time to see how they respond and adapt to your content.
Pro tip: Check out our cold email outreach playbook with 7 touch points over 13 days. We received most of our replies consistently at the third stage of the sequence with this template & were able to book 2-5 meetings/per day.
How to hit a 50% open rate?
Remember, the goal is to hit a 50% open rate, and a 2.5% reply rate. If this isn’t happening, try these –
- If you notice a lower open rate, modify your subject line. Make sure to have medium-length subject lines of around 36-50 characters. Be careful with the words you write for your subject lines. Check out this list of 455 spam-triggering words to avoid.
- If your reply rate is low, experiment with various email copies until you hit the winning one. This is where A/B testing can help you.
Final thoughts
There you go! This is the email checklist that we followed & the lessons we learned that we wanted to share with you. Now it’s time to execute your plan!
Let us know what you think of this guide and if there is anything we can do to make it more beneficial to more salespeople.
Feel free to ask any questions through the live chat on Salesgear.io. Many more handy and practical resources are coming your way. Stay tuned 🙂
Lakshmi Badrinarayanan is on the Product Marketing team at Salesgear, focused on positioning, messaging, customer education, and go-to-market. Having grown through roles across customer success, product, and marketing, she pairs deep product knowledge with a working understanding of what sales teams actually need, and writes about outbound sales, sales tool pricing and comparisons, and modern sales workflows.